はじめに
Shopifyでサイトをカスタマイズしていると、商品の購入フローやサービスの流れを分かりやすく表示したいケースは多いですよね。
特にECサイトでは、お客様に商品購入までの手順を視覚的に伝えることが重要です。
そこで今回は、以下のポイントを押さえながら、コピペですぐに実装できるフローセクションの作り方を解説します。
- コードの詳しい説明付き
- スマートフォン対応済み
- デザインのカスタマイズ可能
- 手順ごとの画像付き解説
このガイドを参考に実装すれば、10分程度で素敵なフローセクションが完成します!
実装に入る前に確認したい方は目次へ、すぐに実装したい方は「実装方法」までスクロールしてください。
完成イメージ
まずは実装するフローセクションの完成イメージをご紹介します。
シンプルで使いやすい、よくあるフローの形式を採用しています。

主な特徴は以下の通りです。
- 数字による順序の明確化
- 画像とテキストの2段構成
- 点線による区切り線
- スマートフォンでは縦並びに自動変換
- カラー設定が自由にカスタマイズ可能
フローセクションは以下のような場面で活用できますので、ぜひご活用ください。
- 商品の購入手順の説明
- サービスの利用ステップ
- 会員登録の流れ
- 申し込みプロセスの案内
実装方法
フローセクションの実装は、以下の3ステップで進めていきます。
それでは、順番に解説していきましょう。
1.フローセクション用のファイルを作成
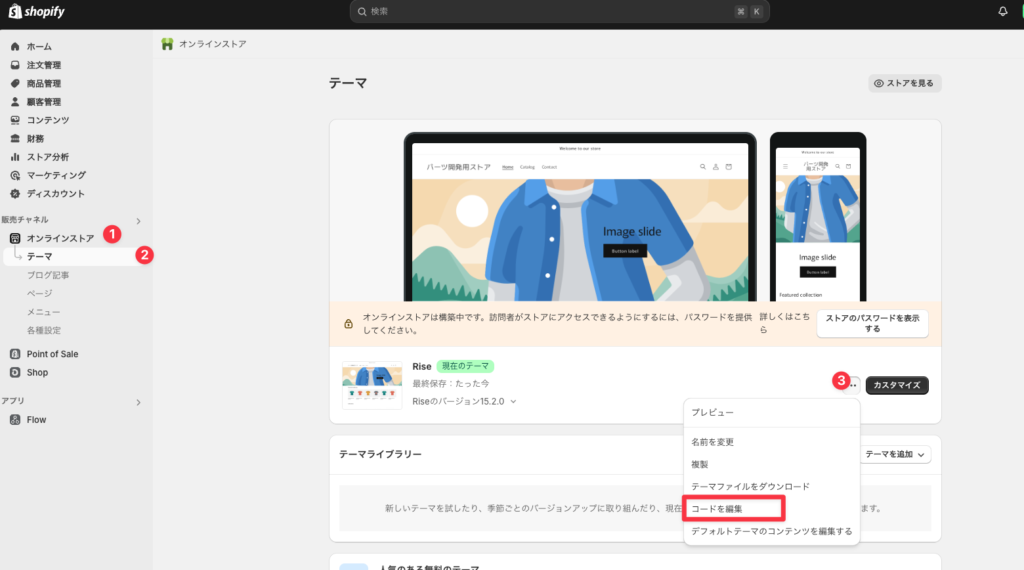
管理画面の「オンラインストア」の「テーマ」から「3点リーダー」をクリックし「コードを編集」を選択してください。
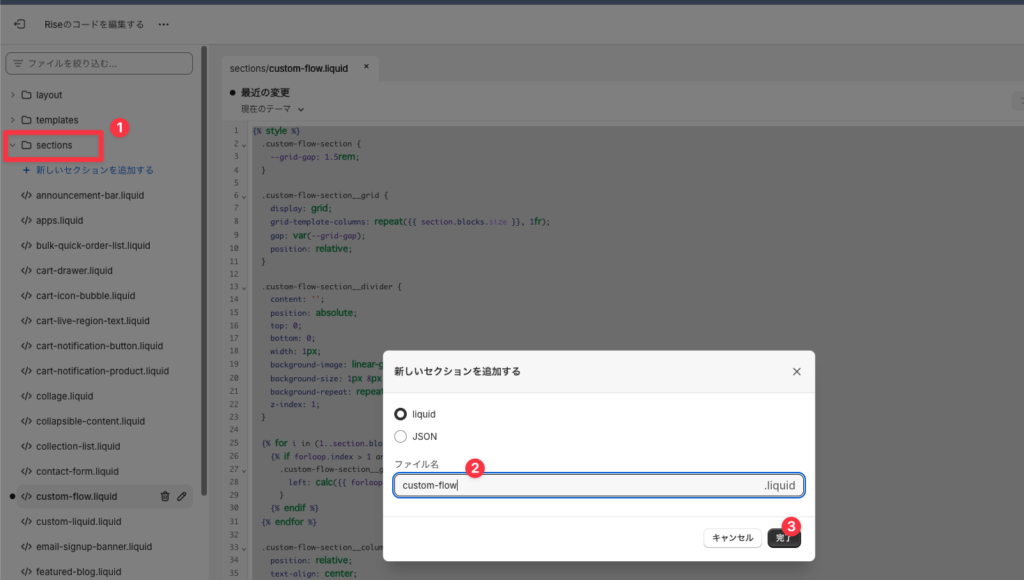
「sections」フォルダを選択して開き、「新しいセクションを追加する」から任意の名前でパーツのliquidファイルを制作してください。
ここでは「custom-flow.liquid」とします。
2.コードの実装
作成したファイルに以下のコードをコピペしてください。
コードを見る
{% style %}
  .custom-flow-section {
    --grid-gap: 1.5rem;
  }

  .custom-flow-section__grid {
    display: grid;
    grid-template-columns: repeat({{ section.blocks.size }}, 1fr);
    gap: var(--grid-gap);
    position: relative;
  }

  .custom-flow-section__divider {
    content: '';
    position: absolute;
    top: 0;
    bottom: 0;
    width: 1px;
    background-image: linear-gradient(to bottom, #ccc 50%, transparent 50%);
    background-size: 1px 8px;
    background-repeat: repeat-y;
    z-index: 1;
  }

  {% for i in (1..section.blocks.size) %}
    {% if forloop.index > 1 and forloop.index <= section.blocks.size %}
      .custom-flow-section__grid .custom-flow-section__divider:nth-of-type({{ forloop.index | minus: 1 }}) {
        left: calc({{ forloop.index | minus: 1 | times: 100 | divided_by: section.blocks.size }}% - 0.5px);
      }
    {% endif %}
  {% endfor %}

  .custom-flow-section__column {
    position: relative;
    text-align: center;
  }

  .custom-flow-section__number {
    position: absolute;
    bottom: 100%;
    top: 0;
    left: 0;
    font-size: clamp(3rem, 10vw, 5rem);
    font-weight: bold;
    color: {{ section.settings.number_color }};
    opacity: {{ section.settings.number_opacity | divided_by: 100.0 }};
    line-height: 1;
    z-index: 2;
    pointer-events: none;
  }

  .custom-flow-section__content {
    position: relative;
    z-index: 1;
  }

  .custom-flow-section__image-wrapper {
    margin-bottom: 1rem;
  }

  .custom-flow-section__image {
    width: 100%;
    height: auto;
    display: block;
  }

  .custom-flow-section__title {
    font-size: clamp(1rem, 3vw, 1.25rem);
    font-weight: bold;
    color: {{ section.settings.title_color }};
    margin-bottom: 0.5rem;
  }

  .custom-flow-section__text {
    font-size: clamp(0.875rem, 2vw, 1rem);
    color: {{ section.settings.text_color }};
    line-height: 1.5;
  }

  @media screen and (max-width: 749px) {
    .custom-flow-section__grid {
      grid-template-columns: 1fr;
    }

    .custom-flow-section__divider {
      display: none;
    }

    .custom-flow-section__column {
      margin-bottom: 2rem;
    }

    .custom-flow-section__number {
      bottom: auto;
      top: -3rem;
    }
  }

  .section-{{ section.id }}-padding {
    padding-top: {{ section.settings.padding_top }}px;
    padding-bottom: {{ section.settings.padding_bottom }}px;
  }

  @media screen and (max-width: 749px) {
    .section-{{ section.id }}-padding {
      padding-top: {{ section.settings.sp_padding_top }}px;
      padding-bottom: {{ section.settings.sp_padding_bottom }}px;
    }
  }
{% endstyle %}

<section class="custom-flow-section page-width section-{{ section.id }}-padding" aria-label="{{ section.settings.section_title | escape }}">
  <div class="custom-flow-section__grid">
    {% for block in section.blocks %}
      {% if forloop.index > 1 %}
        <div class="custom-flow-section__divider" aria-hidden="true"></div>
      {% endif %}
      {% case block.type %}
        {% when 'column' %}
          <article class="custom-flow-section__column" {{ block.shopify_attributes }}>
            <div class="custom-flow-section__number" aria-hidden="true">{{ forloop.index | prepend: '0' }}</div>
            <div class="custom-flow-section__content">
              <div class="custom-flow-section__image-wrapper">
                {% if block.settings.image != blank %}
                  {{ block.settings.image | image_url: width: 800 | image_tag: class: 'custom-flow-section__image', widths: '200, 300, 400, 500', height: block.settings.image.height, width: block.settings.image.width, alt: block.settings.image.alt | default: block.settings.title, loading: 'lazy' }}
                {% else %}
                  {{ 'image' | placeholder_svg_tag: 'custom-flow-section__image placeholder' }}
                {% endif %}
              </div>
              {% if block.settings.title != blank %}
                <h2 class="custom-flow-section__title">{{ block.settings.title }}</h2>
              {% endif %}
              {% if block.settings.text != blank %}
                <div class="custom-flow-section__text">{{ block.settings.text }}</div>
              {% endif %}
            </div>
          </article>
      {% endcase %}
    {% endfor %}
  </div>
</section>

{% schema %}
  {
    "name": "カスタムフローセクション",
    "tag": "section",
    "class": "section",
    "settings": [
      {
        "type": "color",
        "id": "number_color",
        "label": "数字の色",
        "default": "#333333"
      },
      {
        "type": "range",
        "id": "number_opacity",
        "min": 10,
        "max": 100,
        "step": 10,
        "unit": "%",
        "label": "数字の不透明度",
        "default": 20
      },
      {
        "type": "color",
        "id": "title_color",
        "label": "タイトルの色",
        "default": "#333333"
      },
      {
        "type": "color",
        "id": "text_color",
        "label": "テキストの色",
        "default": "#666666"
      },
      {
        "type": "range",
        "id": "padding_top",
        "min": 0,
        "max": 100,
        "step": 4,
        "unit": "px",
        "label": "上部の余白",
        "default": 36
      },
      {
        "type": "range",
        "id": "padding_bottom",
        "min": 0,
        "max": 100,
        "step": 4,
        "unit": "px",
        "label": "下部の余白",
        "default": 36
      },
      {
        "type": "range",
        "id": "sp_padding_top",
        "min": 0,
        "max": 100,
        "step": 4,
        "unit": "px",
        "label": "スマホ上部余白",
        "default": 36
      },
      {
        "type": "range",
        "id": "sp_padding_bottom",
        "min": 0,
        "max": 100,
        "step": 4,
        "unit": "px",
        "label": "スマホ下部余白",
        "default": 36
      }
    ],
    "blocks": [
      {
        "type": "column",
        "name": "カラム",
        "limit": 6,
        "settings": [
          {
            "type": "image_picker",
            "id": "image",
            "label": "画像"
          },
          {
            "type": "text",
            "id": "title",
            "label": "タイトル",
            "default": "タイトルが入ります"
          },
          {
            "type": "richtext",
            "id": "text",
            "label": "テキスト",
            "default": "<p>テキストが入りますテキストが入りますテキストが入りますテキストが入りますテキストが入りますテキスト</p>"
          }
        ]
      }
    ],
    "presets": [
      {
        "name": "カスタムフローセクション",
        "blocks": [
          {
            "type": "column"
          },
          {
            "type": "column"
          },
          {
            "type": "column"
          },
          {
            "type": "column"
          }
        ]
      }
    ]
  }
{% endschema %}
3.セクションの追加と設定
保存ができたら、カスタマイズ画面で「カスタムフローセクション」を追加します。
オンラインストアの「テーマ」から「カスタマイズ」をクリックして、カスタマイズ画面に移動してください。
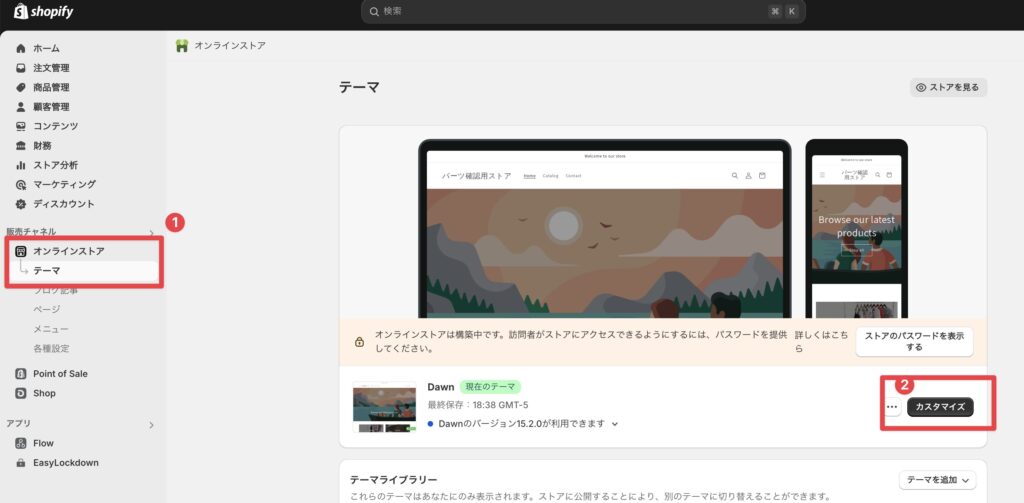
「セクションを追加」から「カスタムフローセクション」を選択して追加してください。
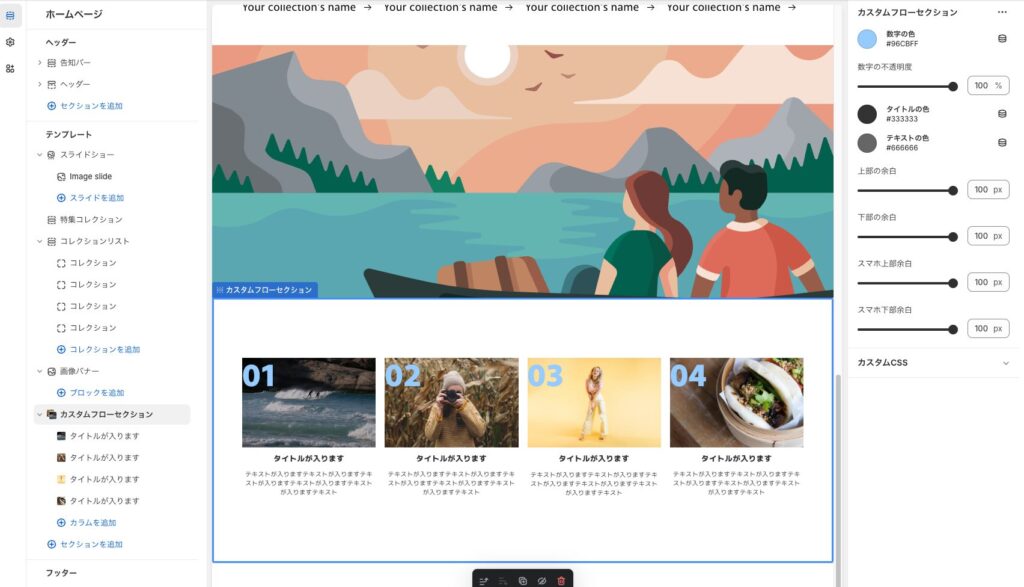
簡単に実装ができたと思います!
このセクションは以下の項目を設定可能ですので環境に合わせて設定してお使いください。
| 設定項目 | 説明 | デフォルト値 |
|---|---|---|
| 数字の色 | 背景の大きな数字の色 | #333333 |
| 数字の不透明度 | 背景の大きな数字の不透明度 | 20% |
| タイトルの色 | 各カラムのタイトルの色 | #333333 |
| テキストの色 | 各カラムの本文テキストの色 | #666666 |
| 上部の余白 | セクション上部の余白(デスクトップ) | 36px |
| 下部の余白 | セクション下部の余白(デスクトップ) | 36px |
| スマホ上部余白 | セクション上部の余白(モバイル) | 36px |
| スマホ下部余白 | セクション下部の余白(モバイル) | 36px |
さいごに
今回は、Shopifyでフローセクションを実装する方法を解説しました。
ポイントを整理すると以下の通りです。
- コピペだけで簡単に実装可能
- PCとスマートフォン両方に対応
- デザインのカスタマイズが自由
- 様々なページで使い回せる
このフローセクションは、商品購入プロセスやサービスの利用手順など、様々な用途で活用できます。
ぜひ、自分のストアに合わせてカスタマイズしてみてください!
