今回は、どのページにも追加できる追従カートの実装方法を解説します。
私もShopifyエンジニアとして2年間、数多くのECサイトを手がけてきましたが、追従カートの実装依頼は特に多い機能の一つです。
簡単にコピペで実装できるようにしていますので、ぜひ参考にしてみてください。
完成イメージ
今回実装する追従カートには、以下のような特徴があります
- どのページにも表示可能
- 商品の切り替えが簡単
- デザインのカスタマイズ可能
- スクロールに追従して表示
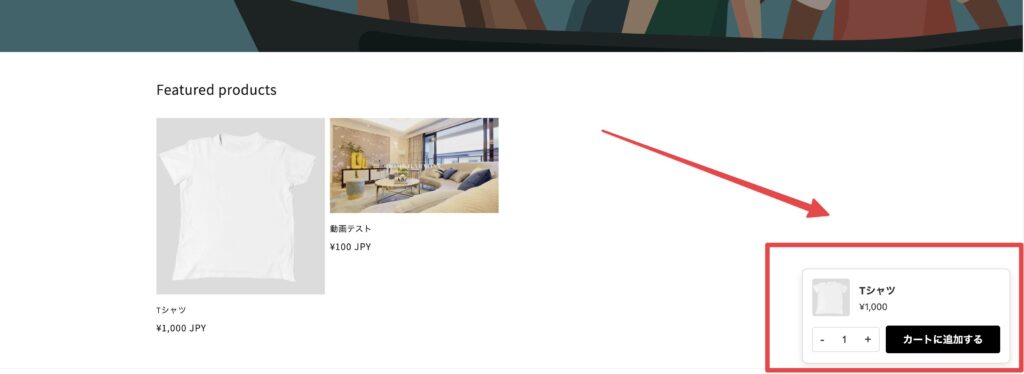
このように、画面右下に固定表示される追従カートを実装していきます。
セクションとして実装するため、管理画面から簡単に設定変更が可能です。
実装手順
セクションファイルの作成
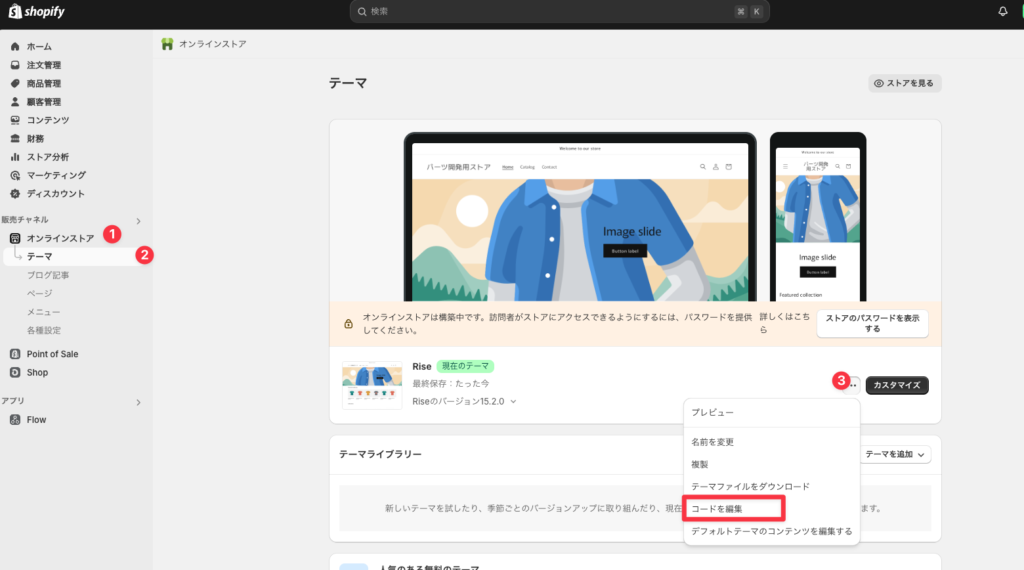
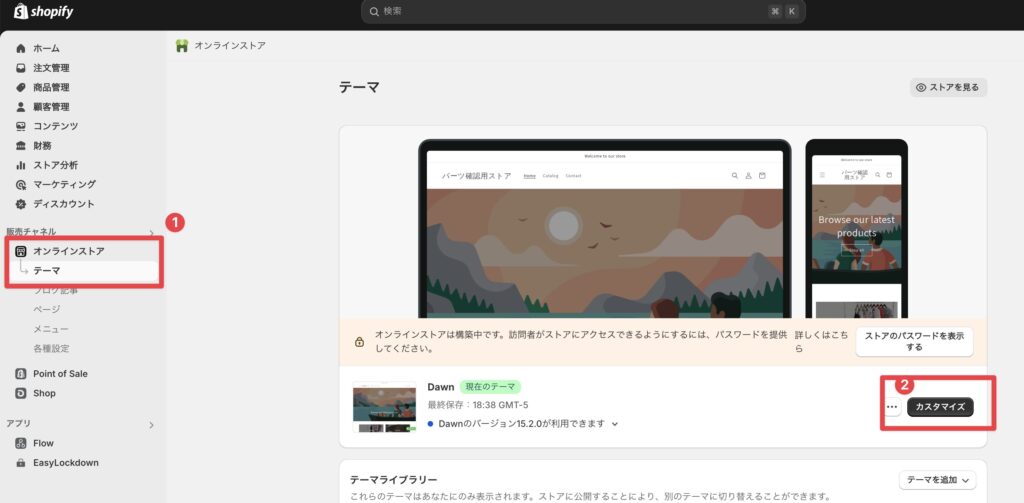
管理画面の「オンラインストア」の「テーマ」から「3点リーダー」をクリックし「コードを編集」を選択してください。
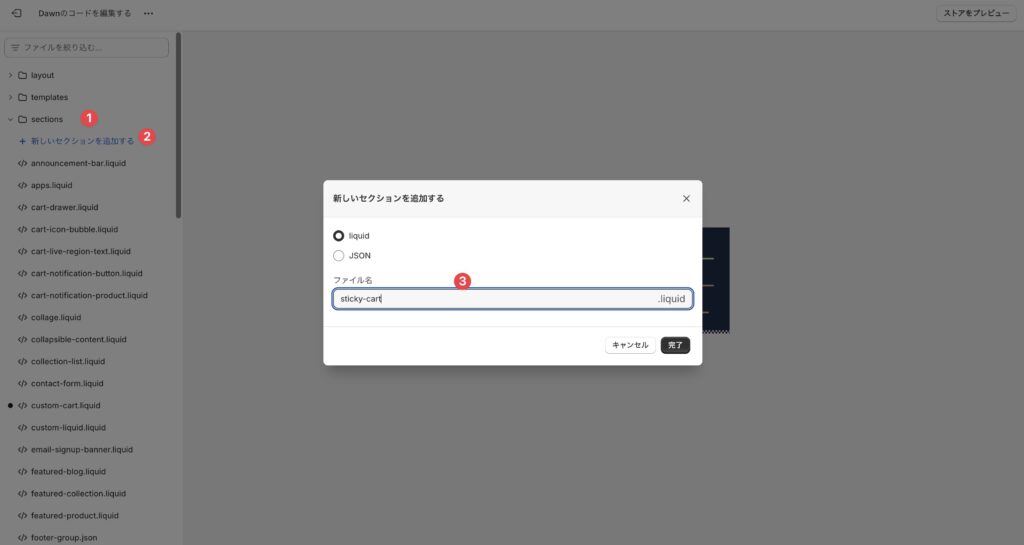
「sections」フォルダを選択して開き、「新しいセクションを追加する」から任意の名前でパーツのliquidファイルを制作してください。ここでは「sticky-cart.liquid」とします。
コードの実装
作成したsticky-cart.liquidに以下のコードを貼り付けてください。
{% schema %}
{
  "name": "Sticky Add to Cart",
  "settings": [
    {
      "type": "product",
      "id": "product",
      "label": "Product"
    },
    {
      "type": "color",
      "id": "background_color",
      "label": "Background Color",
      "default": "#ffffff"
    },
    {
      "type": "color",
      "id": "text_color",
      "label": "Text Color",
      "default": "#333333"
    },
    {
      "type": "color",
      "id": "button_color",
      "label": "Button Color",
      "default": "#000000"
    },
    {
      "type": "color",
      "id": "button_text_color",
      "label": "Button Text Color",
      "default": "#ffffff"
    }
  ],
  "presets": [
    {
      "name": "Sticky Add to Cart"
    }
  ]
}
{% endschema %}

{% assign product = all_products[section.settings.product] %}

<style>
  #stickyCart {
    all: initial;
    font-family: -apple-system, BlinkMacSystemFont, 'Segoe UI', Roboto, Oxygen-Sans, Ubuntu, Cantarell, 'Helvetica Neue', sans-serif;
  }
  #stickyCart * {
    box-sizing: border-box;
  }
  #stickyCart.sticky-cart {
    position: fixed;
    right: 20px;
    bottom: 20px;
    z-index: 9999;
    background-color: {{ section.settings.background_color }};
    border: 1px solid {{ section.settings.text_color | color_modify: 'alpha', 0.2 }};
    border-radius: 8px;
    padding: 15px;
    width: 300px;
    box-shadow: 0 4px 12px rgba(0,0,0,0.1);
    opacity: 0;
    visibility: hidden;
    transform: translateY(20px);
    transition: opacity 0.3s ease, transform 0.3s ease, visibility 0.3s ease;
  }
  #stickyCart.sticky-cart.visible {
    opacity: 1;
    visibility: visible;
    transform: translateY(0);
  }
  #stickyCart .sticky-cart__container {
    display: flex;
    flex-direction: column;
  }
  #stickyCart .sticky-cart__product {
    display: flex;
    align-items: center;
    margin-bottom: 15px;
  }
  #stickyCart .sticky-cart__image {
    width: 60px;
    height: 60px;
    object-fit: cover;
    margin-right: 15px;
    border-radius: 4px;
  }
  #stickyCart .sticky-cart__details {
    flex-grow: 1;
  }
  #stickyCart .sticky-cart__title {
    font-weight: bold;
    margin-bottom: 5px;
    font-size: 1em;
    color: {{ section.settings.text_color }};
  }
  #stickyCart .sticky-cart__price {
    font-size: 0.9em;
    color: {{ section.settings.text_color }};
  }
  #stickyCart .sticky-cart__form {
    display: flex;
    align-items: center;
  }
  #stickyCart .sticky-cart__quantity-wrapper {
    display: flex;
    align-items: center;
    border: 1px solid {{ section.settings.text_color | color_modify: 'alpha', 0.2 }};
    border-radius: 4px;
    margin-right: 10px;
    overflow: hidden;
  }
  #stickyCart .sticky-cart__quantity-button {
    background: none;
    border: none;
    padding: 8px 12px;
    font-size: 1.2em;
    cursor: pointer;
    transition: background-color 0.2s ease;
    color: {{ section.settings.text_color }};
  }
  #stickyCart .sticky-cart__quantity-button:hover {
    background-color: {{ section.settings.text_color | color_modify: 'alpha', 0.1 }};
  }
  #stickyCart .sticky-cart__quantity {
    width: 40px;
    text-align: center;
    border: none;
    font-size: 1em;
    -moz-appearance: textfield;
    background-color: transparent;
    color: {{ section.settings.text_color }};
  }
  #stickyCart .sticky-cart__quantity::-webkit-outer-spin-button,
  #stickyCart .sticky-cart__quantity::-webkit-inner-spin-button {
    -webkit-appearance: none;
    margin: 0;
  }
  #stickyCart .sticky-cart__button {
    background-color: {{ section.settings.button_color }};
    color: {{ section.settings.button_text_color }};
    border: none;
    border-radius: 4px;
    padding: 10px 20px;
    cursor: pointer;
    font-weight: bold;
    flex-grow: 1;
    transition: opacity 0.2s ease;
    font-size: 1em;
  }
  #stickyCart .sticky-cart__button:hover {
    opacity: 0.9;
  }
</style>

<div class="sticky-cart" id="stickyCart">
  <div class="sticky-cart__container">
    <div class="sticky-cart__product">
      <img src="{{ product.featured_image | img_url: '120x' }}" alt="{{ product.title }}" class="sticky-cart__image">
      <div class="sticky-cart__details">
        <div class="sticky-cart__title">{{ product.title }}</div>
        <div class="sticky-cart__price">{{ product.price | money }}</div>
      </div>
    </div>
    <form method="post" action="/cart/add" class="sticky-cart__form">
      <input type="hidden" name="id" value="{{ product.selected_or_first_available_variant.id }}">
      <div class="sticky-cart__quantity-wrapper">
        <button type="button" class="sticky-cart__quantity-button js-quantity-decrease">-</button>
        <input type="number" name="quantity" value="1" min="1" class="sticky-cart__quantity js-quantity-input">
        <button type="button" class="sticky-cart__quantity-button js-quantity-increase">+</button>
      </div>
      <button type="submit" name="add" class="sticky-cart__button">
        {{ 'products.product.add_to_cart' | t }}
      </button>
    </form>
  </div>
</div>

<script>
  document.addEventListener('DOMContentLoaded', function() {
    const stickyCart = document.getElementById('stickyCart');
    let isVisible = false;

    function toggleStickyCart() {
      const scrollTop = window.pageYOffset || document.documentElement.scrollTop;
      const windowHeight = window.innerHeight;
      const documentHeight = document.documentElement.scrollHeight;

      // Show sticky cart when scrolled past 20% of the page
      if (scrollTop > windowHeight * 0.2 && !isVisible) {
        stickyCart.classList.add('visible');
        isVisible = true;
      }
      // Hide sticky cart when near the top of the page
      else if (scrollTop <= windowHeight * 0.2 && isVisible) {
        stickyCart.classList.remove('visible');
        isVisible = false;
      }

      // Hide sticky cart when near the bottom of the page
      if (scrollTop + windowHeight > documentHeight - 100) {
        stickyCart.classList.remove('visible');
        isVisible = false;
      }
    }

    window.addEventListener('scroll', toggleStickyCart);

    const quantityInput = document.querySelector('#stickyCart .js-quantity-input');
    const decreaseButton = document.querySelector('#stickyCart .js-quantity-decrease');
    const increaseButton = document.querySelector('#stickyCart .js-quantity-increase');

    decreaseButton.addEventListener('click', function() {
      if (quantityInput.value > 1) {
        quantityInput.value = parseInt(quantityInput.value) - 1;
      }
    });

    increaseButton.addEventListener('click', function() {
      quantityInput.value = parseInt(quantityInput.value) + 1;
    });
  });
</script>
カスタマイズ設定
実装したセクションは以下の項目がカスタマイズ可能です
- 表示する商品の選択
- 背景色の変更
- テキストカラーの設定
- ボタンデザインの調整
管理画面のカスタマイズから、これらの設定を自由に変更できます。
オンラインストアの「テーマ」から「カスタマイズ」をクリックして、カスタマイズ画面に移動してください。
カスタマイズ画面で「Sticky Add to Cart」を追加し、商品を選択してください。
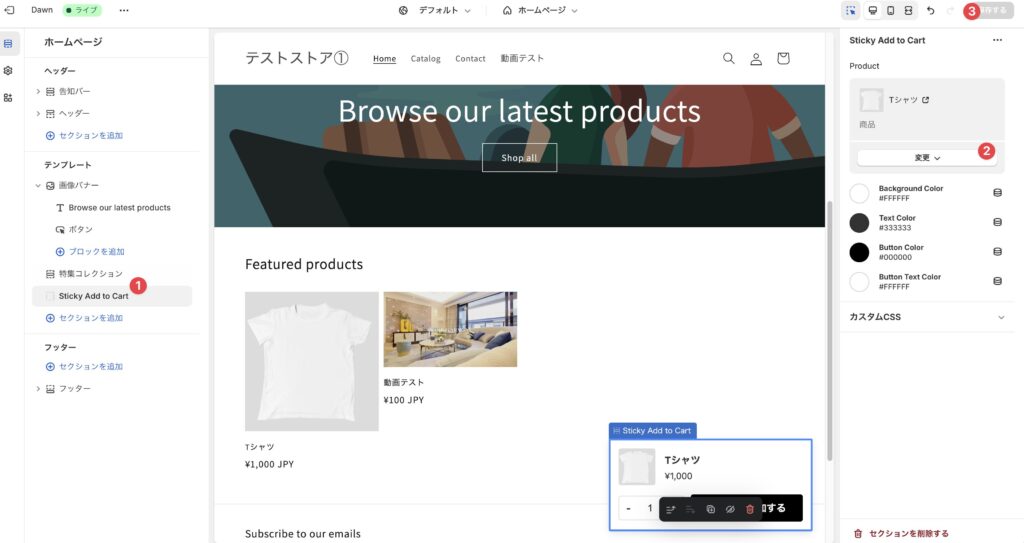
これで実装は完了です!
あとは背景色や文字の色等の見た目を整えて使用してください。
さいごに
今回は、Shopifyで追従カートを実装する方法について、セクションの作成から具体的な実装手順まで解説しました。セクションとして実装することで、どのページにも手軽に追加でき、商品の変更も管理画面から簡単に行えます。
また、背景色やボタンの色など、デザインの調整も管理画面から可能なため、コードを編集することなくカスタマイズができます。ぜひ、この記事を参考に、ご自身のショップに合わせた追従カートを実装してみてください。
このブログでは他にもShopifyのカスタマイズについて解説していますので、あわせて参考にしてみてください。
